Executing workflows on the cloud can be a little scary if you don't know how much you're spending. For peace of mind that you're not going over a project budget, read on for instructions to set up in-app cost reporting in Terra.
Other spend reporting fatures in Terra Note that this setup will also enable spend reporting features in Terra more broadly (see Displaying Google Cloud costs (Billing project owners).
Overview: Workflow cost reporting
To make cloud computing costs more transparent, you can have Terra display the cost for each executed workflow (including failed and aborted workflows) in the Submission History page.
Enabling in-app cost reporting
Most users will need to do a one-time setup on Google Cloud, to allow Terra access to Google's cost reports. Then you'll need to configure spend reporting for each Terra Billing Project you want to track. A few things to keep in mind are below.
How accurate is the cost report? Terra's built-in cost reports come directly from Google. This is the actual cost for the cloud resources used to run a given workflow (it's not an estimate). They are generated by accessing Google's billing repository, so they can take several hours to log.
For more granular costs or cost for workflows in progress, you could try running a cost-estimate notebook. See Cost-estimate notebook.
Built-in cost reports take a few hours to show up
Results from Terra's built-in cost report aren't available until some hours after the workflow has completed (this is a lag in reporting on the Google side). It's best to allow a day to pass before checking in on the cost.
Costs are only reported for completed workflows
The cost is a true cost, not an estimate. It is only available after the workflow is complete.
Reports cover the total job cost
It is not possible with built-in cost reporting to access task-level or instance-level costs (i.e., the cost of running a particular task within a workflow).
Not able to follow these directions?You must have "Owner" permission of the Terra Billing Project and “Owner” or "Admin" permission on the Google Cloud Billing account. If you are not able to follow the directions below, or do not see the options in the screenshots (or they are greyed out), it is likely because you do not have sufficient permissions on the GCP Billing account. You will need to ask the owner for admin privileges on the Cloud Billing account or to set up a BigQuery dataset for billing export (follow directions below).
This may be the case, for example, if you are using a third-party resellers such as Onix.
Step 1: Verify your permissions
Verify you are a Billing project Owner
1.1. Go to your billing page (app.terra.bio/#billing).
1.2. If the billing project is listed in the Owned by you section, you're all set.
To find the Google Billing account associated with this Billing project: 1. click on the billing project link 2. Look next to Billing Account.
1.3. If the Billing Project is under Shared with You, you can click on the Members tab to see who you would need to ask to get that permission.
Verify you are a Google Cloud billing account Owner or Admin
1.4. Go to billing in Google Cloud console (https://console.cloud.google.com/billing) and click on the name of the Cloud Billing account linked to the Terra Billing project.
1.5. If get an error message "You don’t have permission to view costs for this billing account", you will need to ask an owner to expand your role to be able to follow the directions below.
What to do if you don't have Cloud billing account permission Click on the Manage billing account link at the top right (see the arrow in the screenshot below).
Expand the Billing Account Administrator section to see who to ask to grant you permission.
If you use third-party resellers, contact your reseller directly for help.
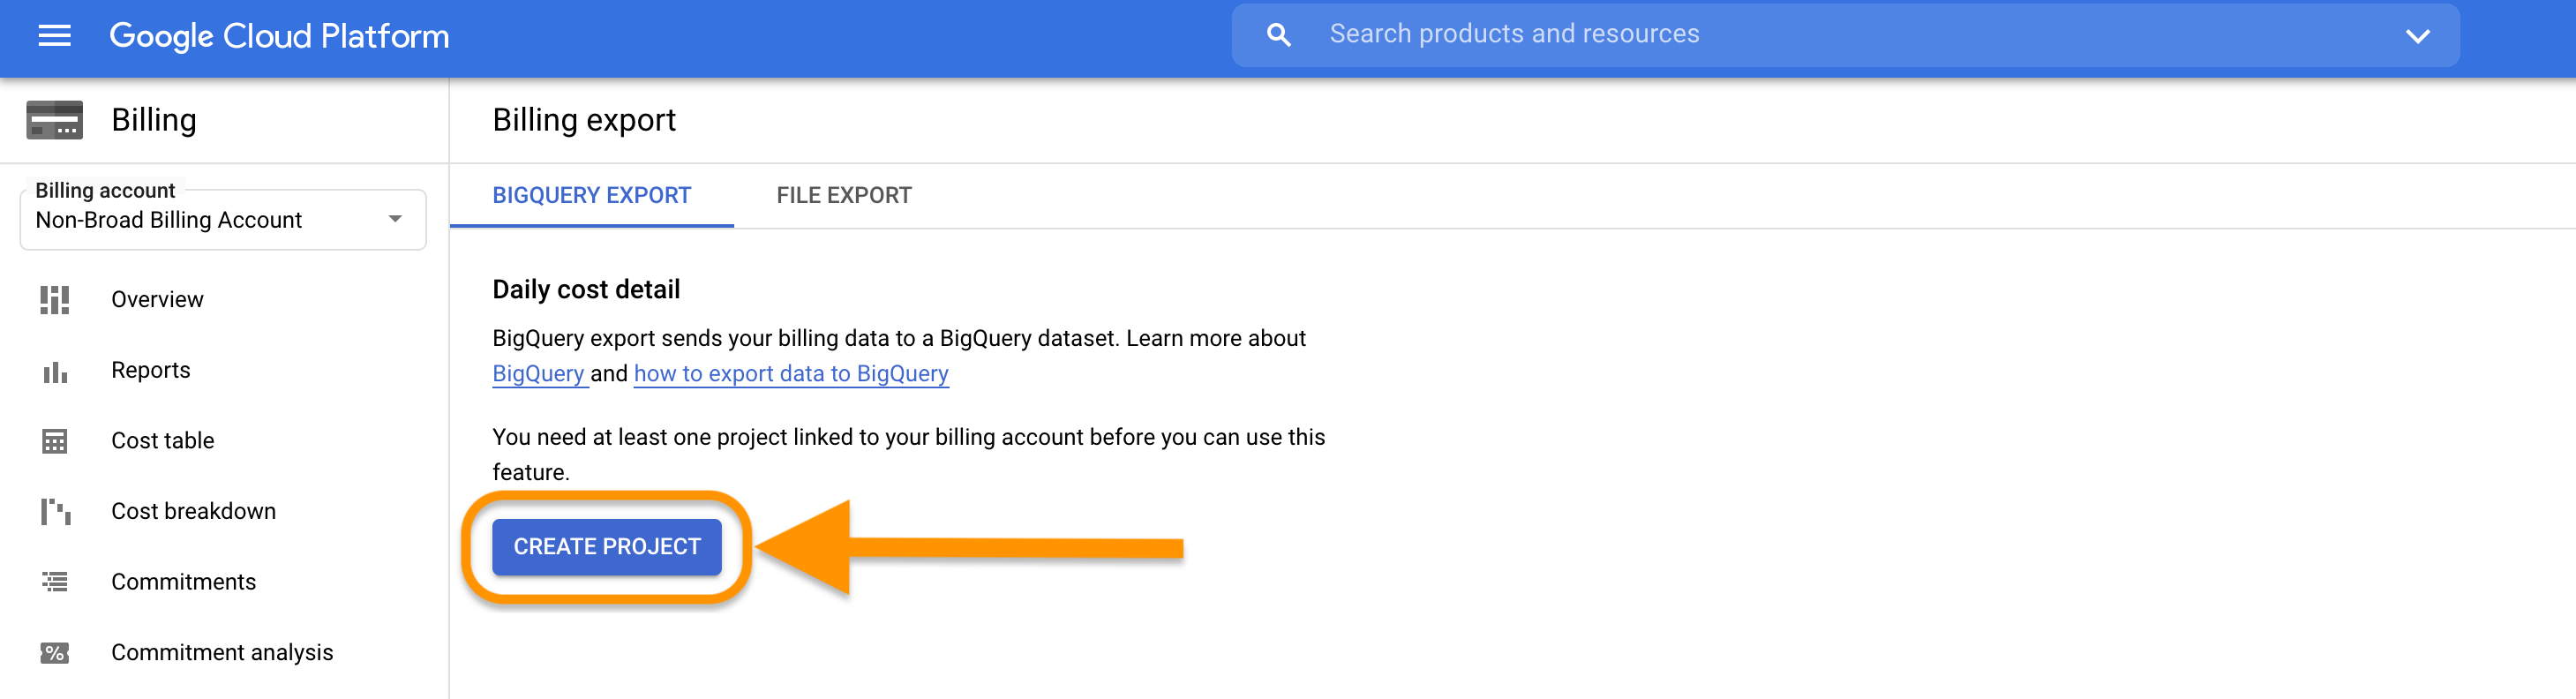
Step 2. Set up billing export (once per Cloud Billing account)
Terra needs to be able to access Google's cost reports (a spend reporting billing dataset on BigQuery) to enable the workflows spend reporting. Google Cloud account owners will set this up in Google Cloud.
You will only need to do this once per Google Cloud Billing account.
Who can skip this step Some users already have billing export set up for their Cloud Billing account. Broad Google Cloud Billing account users and SADA users can skip this first step and go directly to Step 3: Configure the workflow spend report.
-
If you use STRIDES
2.1. Navigate to https://console.cloud.google.com/ and select your project ID.
2.2. Select Menu > BigQuery.
2.3. Follow the instructions to create a dataset
daily_cost_reporting.2.4. Share the
daily_cost_reportingdataset withspend-reporting@terra.bioas BigQuery Dataset Viewer.If you use a third-party reseller
You may need to ask them to set up the spend reporting (in GCP console) for you.
2.1. Create a BigQuery dataset
daily_cost_reportingfor exporting Google billing data.2.2. Share the
daily_cost_reportingdataset withspend-reporting@terra.bioas BigQuery Dataset Viewer.2.3. Give you the Google project ID of the dataset (to use in Step 3 below).
Set up billing export in GCP console
2.1. Navigate to the billing account management page in Google Cloud Console.
2.2. Click on the name of the billing account you would like to enable billing exports for.
If you have more than one Cloud Billing accountYou will need to repeat for each Google Cloud Billing account associated with a Terra Billing Project to enable in-app spend reporting.
2.3. Click on Billing export in the left sidebar (1) and the Edit settings button under Standard Usage costs (2).
Create of configure a native Google project for exported billing data
2.4. Next you will create or configure a non-Terra project to to host a BigQuery dataset for the exported billing data.
Why do you need a Google project for the export dataset?
Storing the export data and querying the dataset will cost a (small amount) of money. The dataset project tracks how much and where to bill the charges.
The Billing project cannot be a Terra-generated workspace projectYou can also select an existing Google project from the dropdown, as long as the ID in the dropdown does not start with terra-. If the project has that formatting, it was created by Terra and will not work for this step.
If you don't have a project, Google will prompt you to create one.
If you only have Terra-generated projects
You will need to create a project to host your dataset.
2.4.1. Go to IAM & Admin (three horizontal lines at top left of the page) and click the button to Create Project.
2.4.2. In the New Project form, fill in the name of your export billing project and select the Cloud Billing account and organization (if applicable).
Don't start your project name with terra-! That will make it hard to separate what is Terra-generated and what you created.
Unable to create a project in Google?If you are unable to follow the instructions (especially if what's on your screen looks different than what's here), you most likely don't have the right permission.
What to do
If you are part of an organization, reach out to your Google Cloud Billing account admin or central organization. See instructions above for how to find the right person to ask. If you use a third-party reseller, reach out to the reseller to ask for help.
Create the BigQuery dataset to store the billing export data
2.5. In the page for the export dataset Google project in GCP console, click on Create new dataset.
2.6. Then fill in the Create dataset form fields
Suggestions/requirements
- Dataset ID: append
_bqfor easy identification (i.e.,daily_terra_cost_details_bq) - Location (Region > us-central1)
2.7. Click the Create dataset button at the bottom.
2.8. Click the blue Save button.
Retrieve the project ID and dataset name
2.9. Next to Dataset name, click on the link to the dataset you just created (circled in the screenshot below).
2.10. From the Dataset info page, copy the Google project ID (to the left of the period) and BigQuery dataset name (to the right of the period) to a safe place. You will need these variables to configure spend reporting in Terra (3.4 below).
How to find Google project ID and BigQuery dataset name
The format is Google project ID . BigQuery dataset name (separated by a period).
In the screenshot below, the GoogleProjectID is billing-export-project-452020and the BigQuery dataset name is terra_daily_cost_details_bq.
Grant Terra permission to view the dataset
2.11. Next you'll give Terra permission to view the billing export dataset. Go to the sharing dropdown above and to the right of the Dataset info and click Permissions.
If this option is greyed out, it is most likely because your role doesn't allow you to share the dataset. You will need to ask the owner of the Google Cloud Billing account to grant you permission to share a BigQuery dataset.
2.12. Select the Add principals button in the Dataset Permissions section.
2.13. Type spend-reporting@terra.bio into the New Principals field (circled in screenshot below) and select BigQuery Data Viewer from the Role dropdown (arrow). This grants Terra permission to access the dataset you've just set up.
2.14. Click the Save button (at the bottom of the form).
Google BigQuery billing exports are now configured for this Cloud Billing account. You can confirm by expanding the menu under BigQuery Data Viewer (below).
The next step will be Step 3: Configure workflow spend report in Terra.
Before you move on to step 3If you just completed Step 2 we recommend you wait several hours to complete Step 3 in order for billable activity to be recorded in BigQuery or you may receive an error that the dataset cannot be found.
Step 3. Configure spend reporting in Terra
Now that you have set up billing data export in Google Cloud, you will set up (configure) spend reporting in Terra. You will only need to do this once per Terra Billing project.
Do you have multiple billing projects?If you have workspaces in multiple billing projects that you want to set up with spend reporting, be sure to repeat the following steps for each billing project.
3.1. Go to the Billing page by first clicking your name and selecting Billing from the main navigation menu (top left of any page in Terra).
3.2. Select the Terra Billing project you want to enable spend reporting for.
Note that you need to be an owner to follow these steps. You'll know you're the owner if you see the Terra billing project listed under Owned by You in the top left column.
3.3. Click the pencil icon beside Workflow Spend Report Configuration to edit.
3.4. Fill in the Dataset Project ID (i.e., Google project ID) and Dataset Name (i.e., BigQuery dataset name) from GCP console (step 1.11 for general users or step 1.9 for STRIDES - above) in the Configure Spend Reporting form.
2.5. Click the OK button to save.
What to expect
You will not get a confirmation message, but as long as you don't get an error message, your configuration should be saved.
If you get an error that looks like this
Example error text
Error updating workflow spend report configuration
The billing export table <name here> in dataset <dataset name> could not be found
Full error
{
   "causes": [],
   "message": "The billing export table gcp_villing_export_v1_012061_174696_8A47BC in dataset
terra_daily_cost_details could not be found.",
   "source": "rawls",
   "stackTrace": [],
   "statusCode": 400,
   "timestamp": 1631824489662
}
What is happening?
This error occurs when there is currently no data in the dataset.
To remedy this, try the following
1. Run a small workflow in the workspace.
2. Wait 2-3 hours and follow steps 2.1 - 2.5 again.
How to find built-in workflow cost reporting
1. Navigate to the Submission History page of the workspace.
This page includes all workflow submissions for the workspace
2. Click the submission of interest in the far left column.
3. If your spend reporting has been correctly set up, you will find the Total Run Cost at the top right corner. Note that the spend report can take up to 24 hours to appear in Terra, as GCP costs reports have some delay.
If your submission included more than one execution, each will be listed separately under Run Cost.
For more granular cost details
Step-by-step instructions for querying the billing export dataset directly here.