Occasionally, you may need to extend the default autopause time (30 minutes) to accommodate long-running (i.e., more than 24 hours) jobs. Note: Autopause is already disabled for up to 24 hours as long as the kernel is running.
For more information about autopause and how it works in Terra, see Preventing runaway costs with Cloud Environment autopause.
Before disabling or adjusting autopause - be mindful of runaway costsAutopause protects users from runaway charges when a job is done and they are not actively working in their Cloud Environment. Turning off autopause or extending the time limit may lead to additional charges since the Cloud Environment will continue to bill until the user manually pauses or deletes the cluster.
Cautions about adjusting the autopause threshold
You will want to strike a balance between an autopause value that is too short (not long enough to complete your analysis) and one that is too long (so your Cloud Environment sits there running up changes without actually doing any work).
The safest practice may be to adjust the threshold to a large number (e.g., 600 minutes) for long jobs and then adjust it back to 30 minutes when done. That way, you won't add rack up extra charges related to your Cloud Environment.
Autopause will not kick in if your browser is active and your screen is on. Your Cloud Environment will never pause if you don't close your Cloud Environment browser tab and your computer is set to never go to sleep. Note: This can be risky, as it could incur large and unanticipated costs.
Option 1: Adjust autopause in Terra
You can adjust autopause in your workspace when you create your Cloud Environment.
Autopause can only be extended to 999 minutes in TerraTo set a longer autopause, you will need to customize using the Swagger API (see below).
1.1. In the Jupyter Cloud Environment pane, select the Customize button at the bottom right.
1.2. In the customization pane, you can change the default autopause time in the Cloud compute profile field (just below the Compute type dropdown).
Option 2: Adjust autopause using Swagger API
You can also adjust autopause on a currently Running or Stopped cluster by sending a PATCH command using Swagger.
Note that if you want to extend the autopause beyond 999 minutes, you must use Swagger.
Step 1: Find the Cloud Environment cluster name
There are a couple of ways to find the name of your Cloud Environment. The easiest way is to navigate to https://app.terra.bio/#clusters and find the name of your active Cloud Environment under Details.
The name will be in the form saturn-alphanumeric-string.
Example:

Another way to find the cluster name
If you are using a Jupyter Notebook, you can find the name by 1) right-clicking the Jupyter logo in the top left and 2) selecting "Copy Link Address."
| 1. |
2. |
The unique cluster id (part of the link address) is created when you make your cluster. The link will have the format below. The cluster id is the part highlighted in blue-purple:
https://notebooks.firecloud.org/notebooks/broad-firecloud-dsde/saturn-210a411b-aaf6-4b37-a1a8-f8acdae6d816/tree
Step 2: Use the Swagger interface to adjust the autopause time
Swagger (an API management system that uses a web browser interface to facilitate cluster creation and management) contains a set of scripts that allow you to configure your Cloud Environment directly from the browser.
2.1.To open the Swagger interface, go tohttps://notebooks.firecloud.org/#/runtimes/updateRuntime.

2.2. Click on the open lock on the right-hand side to authenticate. This is how Swagger ensures that you have permission to adjust the autopause.
2.3. In the authorizations popup, check all three authorization boxes and click the green Authorize button. The lock will be closed when this is complete.
2.4. Click the Try it out button to change the parameters.
2.5. Next, you'll fill in the parameters form.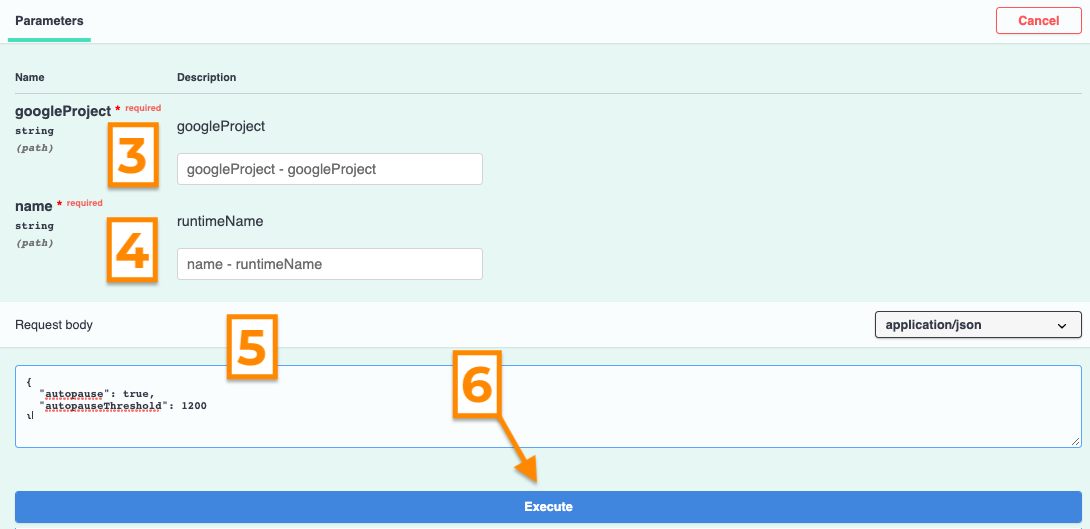
Parameter values
-
googleProject- the Terra billing project associated with the Cloud Environment in question -
runtimeNameis from Step 1 (above). -
Request bodyspecifies what you want the cluster to do.
2.6. You can remove the prefilled options in the body. Make sure your request is specific to autopause by only leaving the options below.
2.7. To adjust the threshold, enter a new value (in minutes).
{
"autopause": true,
"autopauseThreshold": 1200
}
To turn autopause off completely, use the body below.
{
"autopause": false
}
Beware of runaway costs when turning off autopause!This will allow the Cloud Environment to run indefinitely unless it is manually paused or deleted. There is a real danger of runaway costs from disabling autopause, so it is generally not recommended over setting a high autopause threshold.
2.8. Click Execute.
What to expect
The Responses section indicates whether the request went through. After clicking execute, it will be the first response listed at the top.
If your response doesn't make sense, please contact the Support team for help.