Learn how to use workspace roles and managed groups to control how much - and with whom - you share in Terra. Terra Groups are an excellent way to share the same resources with specific people. They are especially useful if the specific people you want to share with may change (if someone leaves your team, for example).
Terra workspace permissions determine who can access data and run analysis tools and who can incur Google Cloud costs.
Controlling access to workspace data and analysis tools
Workspace Owners control access to data and tools in a workspace by granting permissions to collaborators at the workspace level. To learn more about billing roles, see Best Practices for managing shared funding.
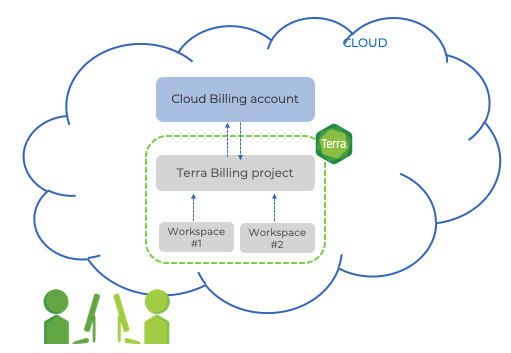
Blue boxes are Google resources, and grey are Terra resources.
Workspace permissions/roles
What's in a workspace?
- Data in workspace Cloud storage (Google Bucket or Azure blob storage container)
- Data and metadata in workspace data tables (note that colleagues only can access protected data stored in an external location if they have authorization)
- Analysis tools
- Workflows (note that this is true even if a user does not have access to the workflow in Dockstore or the Broad Methods Repo since the WDL code can be viewed in the workspace)
- Jupyter notebooks
- R markdown files
If you don’t want someone to see your work, don’t share your workspace with them.
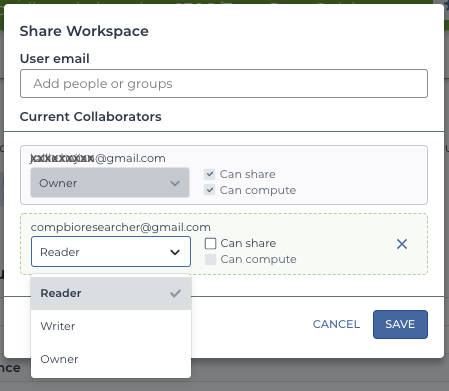 |
When you share a workspace, you grant each collaborator a role, or permission level, in the share screen (screenshot at left). |
Workspace creators are owners by defaultWhen you create a workspace, Terra automatically makes you the "owner." Owners control who can share the workspace, access data, and accrue costs (run workflows or interactive analyses) by assigning roles (permission) to collaborators.
Workspace roles and what they allow collaborators to do
Workspace permissions determine who can perform operations with a Google Cloud cost!A collaborator does not have to be a billing project user to incur costs. Workspace roles that allow users to incur costs include "Writer" and "Owner" and anyone with "Can-compute" permission. All Google Cloud fees are paid for by the Terra Billing project associated with the workspace.
Workspace roles that allow users to accrue Google Cloud costs are noted in red.
Owner
- Can incur storage, compute, and query costs
- May add/remove users (grant access), lock workspace, etc.
Writer
- Can incur storage costs by adding data to the workspace bucket
- May write to/add tables, workflow configs, etc. Can also have "can share" and "can compute" permission (optional).
Reader
- Can incur egress costs from downloading the data
- May read tables, method configs, etc.
- Can also have "can share" permission (optional).
Can-compute
- Can run a workflow or start a Cloud Environment; can generate data that is then stored in the workspace bucket
- Able to launch workflows and interactive analyses (notebooks).
Share-writer
- Can enable others to incur costs - also, see Writer, above
- Able to grant others write access.
Share-reader
- Able to grant others read access.
See the chart below for examples of actions people with different roles can perform.
Examples of actions |
Owner | Writer | Reader |
| Can edit workspace documentation, data tables |
yes |
yes |
no |
| Can access data in the workspace bucket |
yes |
yes |
yes |
| Can give others access |
yes |
yes (with "can share") |
yes (with "can share") |
|
Can run workflows and |
yes |
yes (with "can compute") |
no |
|
Can store data |
yes |
yes |
no |
Managed groups - Enabling many users to access the same resources
A collaborative team may have many members, workspaces, and even separate billing projects. To streamline resource management, since teams often change, owners can assign roles to a managed group as well as to an individual. For example, a managed group could include everyone in a research team who might need access to the same workspace or billing project.
Best practices for managing changing teams
When team members change, owners can adjust the group membership on the Groups page of Terra. This way, owners automatically update the users for every resource shared with the group. They don't have to update every workspace, billing project, etc.
Roles for managed groups
Member
Any individual in the group. When any form of access is granted to a group, that access will apply to all group members.
Admin
May add or remove other admins or members. Admins are also group members.
Group roles versus resource permissionsPermissions for managed groups are not the same as permissions for other resources. If a group is given access to a workspace, the workspace owner controls the workspace role for the whole group (i.e., Reader or Writer). The group's admin only controls who is in the group (and who may modify the group itself).
For example, if a group has the role of Writer (not Owner) in a workspace, even a group
admin will only have Writer access.
Create your team Terra group in four steps
1. Start at the Main Menu (from the top left of any page in Terra).
2. Go to your Groups page (Main menu > Groups).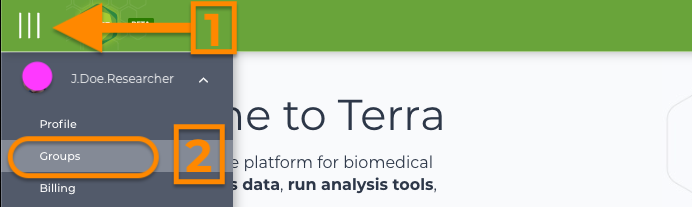
3. In the Create a New Group card, click on the blue "+" icon.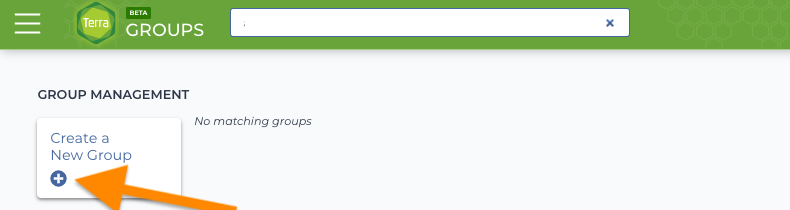
4. Enter your human-friendly team group name and click the Create Group button.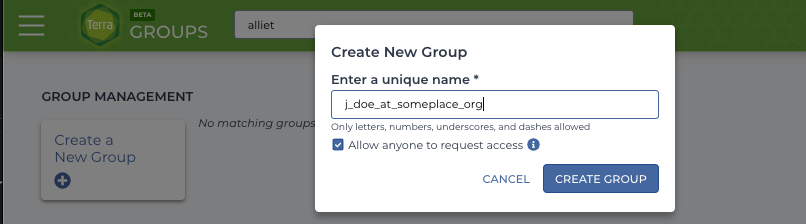
You can share resources with the group just like with an individual.
Note: The group admin can change who is in the group at any time in Terra. To add more people, click on the group name and click + Add User.
Permissions and groups and access to resources and billing - a lab scenario
Follow the story diagram below to see how permissions, groups, and billing might affect access to resources in a cartoon lab scenario.
-
1. The head of a research laboratory (User #1) creates a billing project - they are the "Owner" of the billing project
2. User #1 assigns the “workspace creator” role to their post-doctoral fellows (User #2), charging them to create a fresh workspace to share with potential collaborators. The workspace will include shared data resources uploaded to the workspace Google bucket.
3. The postdoc creates the workspace (they are automatically the Owner of the workspace), adds some content, and then invites another coworker (User #3) to help edit the content - giving them “writer can-compute” permission in the workspace.
4. User #3 can now edit and run code in the workspace but cannot give other new users access. Can you guess what role they have concerning the workspace resource?
5. In the meantime, a researcher from an unrelated group (User #4) - who wants to introduce a team of students to Terra - creates a managed group (they’re the "Owner" of the group).
6. If students (User #5, User #6) need to access the workspace, User #2 (workspace owner) must give the group created by User #4 reader permission for that workspace. All the group's members, including the group's owner, will have "read" permissions on the workspace.
7. The group (users #4, 5, and 6) now has “Reader” permission.